WINDOWS 8
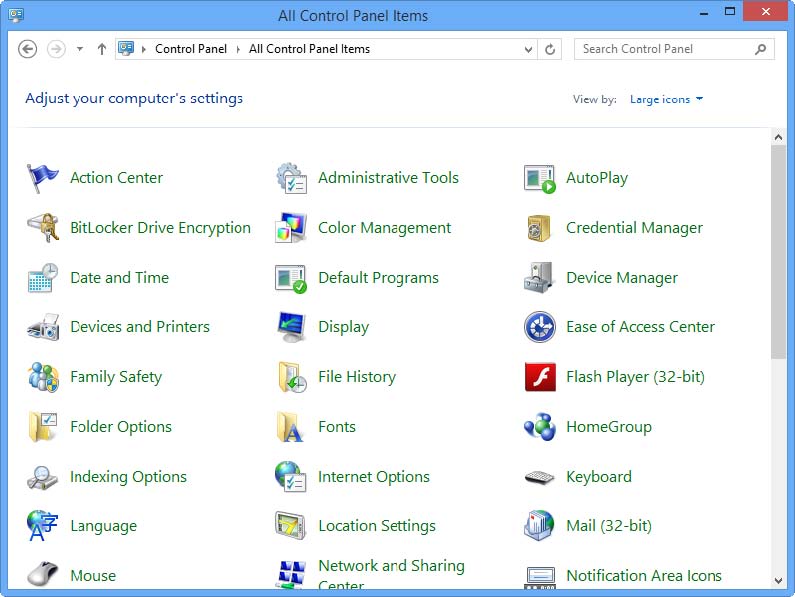
1. Go to Control Panel>System And Security and click System.
2. Click on the Advanced System Settings in the panel right side.
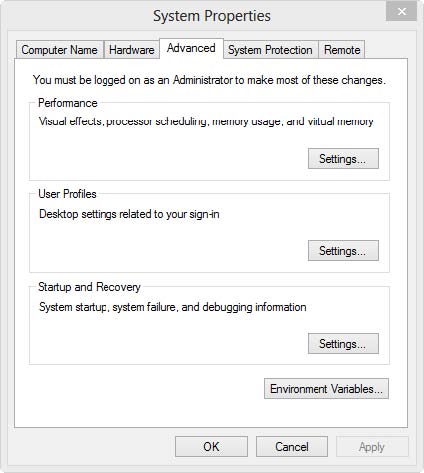
3. Click the Advanced tab in the System Properties box.
4. Click Settings in the Performance section.
5. Click the Advanced tab in the dialog box.
6. Click the Change button.
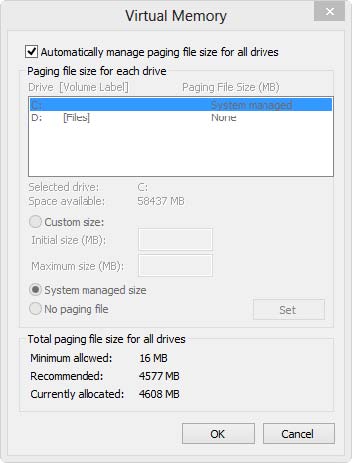
Now in the Virtual Memory dialog box you can change the pagine file settings.
Clear the Automatically Manage Paging File and selecting the Custom Size option to tell Windows to keep the paging file at a constant size; the access to files is quickier so Windows no longer has to resize the paging file according to the amount of data temporarly stored in there. In both the Initial Size and Maximum Size enter the recommended size for virtual memory as suggested by Windows (usually above 5GB). Finally click on Set and then OK three times to close the boxes.
Does your Windows 8 system works more smoothy now? Please let us know in comments.
WINDOWS 7
-
Open System by clicking the Start button
, right-clicking Computer, and then clicking Properties.
-
In the left pane, click Advanced system settings.
If you're prompted for an administrator password or confirmation, type the password or provide confirmation.
-
On the Advanced tab, under Performance, click Settings.
-
Click the Advanced tab, and then, under Virtual memory, click Change.
-
Clear the Automatically manage paging file size for all drives check box.
-
Under Drive [Volume Label], click the drive that contains the paging file you want to change.
-
Click Custom size, type a new size in megabytes in the Initial size (MB) or Maximum size (MB) box, click Set, and then click OK.
-
Saturday, 12 April 2014
ADDING VIRTUAL MEMORY SIZE IN WINDOWS 7& 8
The Antivirus Defense-in-Depth Guide
The Antivirus Defense-in-Depth Guide
- View all security guidance topics
- Server Security
- Desktop Security
- On This Page
- Introduction
- Guide Chapter Summary
- Give Us Your Feedback
Introduction
Although many organizations have deployed antivirus software, malicious software such as computer viruses, worms, and Trojan horses continue to infect computer systems around the world. There is no single reason for this apparent contradiction, but the current situation indicates that the standard approach of deploying antivirus software on each computer in your environment may not be sufficient.
The Antivirus Defense-in-Depth Guide provides an easy to understand overview of different types of malware, or malicious software, including information about the risks they pose, malware characteristics, means of replication, and payloads. The guide details considerations for planning and implementing a comprehensive antivirus defense for your organization, and provides information on defense-in-depth planning and related tools that you can use to help reduce your risk of infection. The final chapter of the guide provides a comprehensive methodology to help you quickly and effectively respond to and recover from malware outbreaks or incidents.
Top of page
Guide Chapter Summary
The Antivirus Defense-in-Depth Guide consists of four chapters:
Chapter 1: Introduction
This chapter presents a brief introduction to the guidance, an overview of each chapter, and the intended audience of the guide.
Chapter 2: Malware Threats
This chapter defines the primary types of malware and specifies what types of programs are included — and excluded — in this category. It also provides information about malware characteristics, attack vectors, means of propagation and payloads.
Chapter 3: Antivirus Defense-in-Depth
This chapter details considerations for establishing a comprehensive antivirus defense for your clients, servers, and network infrastructure. It also discusses user policies and general security measures that Microsoft recommends considering when forming your overall security plan.
Chapter 4: Outbreak Control and Recovery
This chapter provides a step-by-step approach to resolving and recovering from malware attacks, based on industry best practices and internal operations at Microsoft.
Top of page
Give Us Your Feedback
We would appreciate any feedback you might have on this guidance. In particular, we would be grateful for any feedback on the following topics:
•
How useful was the information provided?
•
Were the step-by-step procedures accurate?
•
Were the chapters readable and interesting?
•
Overall, how would you rate the guidance?
Send your feedback to secwish@microsoft.com. We look forward to hearing from you.
DO ANDROID VIRUS EXIST?
Should You Worry About Getting a Cell Phone Virus?
You may be asking yourself, what if I have a cell phone virus and what is it anyway? You know you keep a lot of precious, valuable data on your phone, and when you hear in the news that mobile threats are on the rise, it’s easy to lose sight of the context behind the numbers and worry that you’ve gotten a dreaded mobile phone virus that’s going to steal your personal info and eat your children.
Is there really such a thing as an Android virus?
Historically carried over from the old PC world, a “virus” is a program that replicates itself by attaching to another program. Hackers often used this method to spread their nefarious work, and virus became a popular term to refer to all types of malicious software (malware) on computers. In the case of smartphones, to date we have not seen malware that replicate itself like a PC virus can, and specifically on Android this does not exist, so technically there are no Android viruses. However, there are many other types of Android malware. Most people think of any malicious software as a virus, even though it is technically inaccurate.So what is Android malware?
Malware, short for malicious software, is software designed to secretly control a device, steal private information or money from the device’s owner. Malware has been used to steal passwords and account numbers from mobile phones, put false charges on user accounts and even track a user’s location and activity without their knowledge. Learn about some of the most notable malware Lookout has blocked in Resources Top Threats.
How would I get malware on my phone?
Through Lookout’s research for the State of Mobile Security 2012, we’ve found that user behavior and geography greatly influence your risk of encountering malware. The safest bet is to stick with downloading well-known apps from well-known apps from reputable markets like Google Play in addition to having a security app. Fraudsters make it their job to disguise malware as innocent-looking mobile apps on app stores and websites. So if you’re thinking that it’s a good idea to download a just-published, supposedly free version of Angry Birds you found on a random Chinese app store, it’s probably not. Once installed, these apps may appear to work just as described, but they are can be busy with additional secret tasks. Some apps start out clean, but are given malicious capabilities after a seemingly routine software update.And conscientious app downloading won’t always minimize your risk. Sneaky, drive-by-download sites can download a potentially malicious app file without any user intervention. Safe Browsing in Lookout Premium for Android will block web-based threats like that, but even so, you also shouldn’t install random downloads from your download manager that you didn’t expect to find there.

How can I protect myself and my mobile device?
It’s pretty simple to minimize the risk of encountering malware, and we’ve got 5 simple mobile security tips right here. The top two ways to protect yourself are to download a mobile security app like Lookout to catch those pesky “phone viruses” and to be judicious about what apps you download and were you download them from. Lookout will scour your phone or tablet for any existing malware, and also examine every new app you download to ensure it is safe. But even before you let Lookout scan your newly downloaded app, you should only download apps from sites you trust, check the ratings and read reviews to make sure they’re widely used and respected.So, should you worry about getting a phone virus? Nope, because they technically don’t exist. (If they ever do crop up, Lookout will weed them out.) And should you worry about the more accurately termed malware? Well, with a little bit of awareness and Lookout on your phone and by your side, you can keep malware and other mobile threats at bay.
BUILDING YOUR OWNCOMPUTER
Introduction
In this tutorial I will try an teach you how to successfully build your own computer! There are many benefits to building your own computer.
Here we will discuss a list of the parts you need and the best place to purchase them. If you want the best
prices on computer hardware you will definitly want to look online. Unfortunatly (and for some of you very fortunatly
if you know what I mean) this requires the use of a credit card. Below is a general list of the devices you will
need...

may vary depending on which Operating Systems you plan on running.

Section #2 (Which Brand And Model Should I Buy?)
We'll lets start with your computer case and move all the way down to Miscellaneous Accessories..
1. Computer Case
You will most certainly need an ATX style case with a quality power supply. How do you tell? Well if the case
is only 15-20 bucks theres a pretty good chance its a crappy power supply.
2. A Mother Board
I suggest a quality ASUS (ATX style to match your computer case) mother board its up to you ask your friends.
I've had bad experiences personally with FIC
mother boards.
3. A Floppy Drive and CDROM
Pretty inexpensive stuff, i'd suggest a Sony Floppy drive and a generic CDROM. Doesn't make too much a difference if your
concerned about getting the best price.
4. Hard Disks
Gets alittle tricky. If you want reliability, high speed transfers, and are willing to run Windows I suggest a Western Digital
or a Seagate ULTRA DMA-66. If your not to concerned with speed and want to run a server with Unix i'd go with a Fujitsu or
a Western Digital. Their farely inexpensive but only transfer in 33 megabit bursts as apposed to the DMA-66 which transfer
in 33 megabit bursts. I don't believe Unix currently supports ULTRA DMA-66, but don't quote me on that. Now there's an even faster
transfer rate available via SCSI Hard Disk Controllers, but i'm not about to go into setting up SCSI controllers in this tutorial.
For now we will stick with IDE Hard Disk controllers.
5. Video Cards
Video cards are cheap and if your not a gamer a plain ole gener Cirrus Logic or STB video card will do fine.
6. IDE Controller Ribbon
You'll need 2 different kinds of IDE Ribbon 2 40 pins for your CDROM and Hard Disk and Another with less pins for your floppy.
You can buy these at any local computer store or order them off the web.
7. Miscellaneous Stuff
You may be interested in adding a sound card, ethernet card, and/or 3DFX card to your system. These are relatively easy to do and
I will explain how to add card's to your mother board later.
Section #3 (Where do I buy all this crap!?)
Well if your looking for the best prices online for computer hardware (and this is my unbiast opinion) i'd suggest going to
http://www.pricewatch.com again ask your friends maybe they know a better place. Pricewatch.com researchs the best prices
on computer hardware.
Section #4 (Lets Assemble!)
This next part is very important so read carefully...
Ok your ready to give it a whirl, you'll need to get in your system bios. The "DEL" key should usually get you in.
Get it to autodetect your hard disk. Accept the Setting and Save your Configurations. Install Your OS and your ready to go.
That easy!! Ha! you'll prolly have lots of trouble theres a million resources online to help you. Get to it.
In this tutorial I will try an teach you how to successfully build your own computer! There are many benefits to building your own computer.
- You get hand's on experience learning how a computer works
- Its a hell of alot less expensive then buying one from a retailer
- Its a hell of alot more reliable than buying one from a retailer being that you hand select QUALITY parts and put it togethor yourself.
- You can do your own tech support no more relying on stupid Best Buy Tech's that don't know the difference between their ass and a hard disk jumper (don't worry I'll tell you what those are later)
Here we will discuss a list of the parts you need and the best place to purchase them. If you want the best
prices on computer hardware you will definitly want to look online. Unfortunatly (and for some of you very fortunatly
if you know what I mean) this requires the use of a credit card. Below is a general list of the devices you will
need...
- A Computer Case (Something To Put All The Computer Parts Togethor In)
- Should only run you about 50 dollars
- Beware the cheap ones with cheap power supplies they will die in a year
- A Mother Board (Everything Will Be Plugged Into The Mother Board)
- A Floppy Drive and a CDROM (Should Be Obvious)
- A Hard Disk (Come In Many Different Flavors and Quality Levels, Stores All The Information In Your Computer)
- A Video Card (Cheap Stuff, Its What Your Monitor Plugs Into)
- IDE Controller Ribbon
- Miscellaneous Accessories
may vary depending on which Operating Systems you plan on running.
Section #2 (Which Brand And Model Should I Buy?)
We'll lets start with your computer case and move all the way down to Miscellaneous Accessories..
1. Computer Case
You will most certainly need an ATX style case with a quality power supply. How do you tell? Well if the case
is only 15-20 bucks theres a pretty good chance its a crappy power supply.
2. A Mother Board
I suggest a quality ASUS (ATX style to match your computer case) mother board its up to you ask your friends.
I've had bad experiences personally with FIC
mother boards.
3. A Floppy Drive and CDROM
Pretty inexpensive stuff, i'd suggest a Sony Floppy drive and a generic CDROM. Doesn't make too much a difference if your
concerned about getting the best price.
4. Hard Disks
Gets alittle tricky. If you want reliability, high speed transfers, and are willing to run Windows I suggest a Western Digital
or a Seagate ULTRA DMA-66. If your not to concerned with speed and want to run a server with Unix i'd go with a Fujitsu or
a Western Digital. Their farely inexpensive but only transfer in 33 megabit bursts as apposed to the DMA-66 which transfer
in 33 megabit bursts. I don't believe Unix currently supports ULTRA DMA-66, but don't quote me on that. Now there's an even faster
transfer rate available via SCSI Hard Disk Controllers, but i'm not about to go into setting up SCSI controllers in this tutorial.
For now we will stick with IDE Hard Disk controllers.
5. Video Cards
Video cards are cheap and if your not a gamer a plain ole gener Cirrus Logic or STB video card will do fine.
6. IDE Controller Ribbon
You'll need 2 different kinds of IDE Ribbon 2 40 pins for your CDROM and Hard Disk and Another with less pins for your floppy.
You can buy these at any local computer store or order them off the web.
7. Miscellaneous Stuff
You may be interested in adding a sound card, ethernet card, and/or 3DFX card to your system. These are relatively easy to do and
I will explain how to add card's to your mother board later.
Section #3 (Where do I buy all this crap!?)
Well if your looking for the best prices online for computer hardware (and this is my unbiast opinion) i'd suggest going to
http://www.pricewatch.com again ask your friends maybe they know a better place. Pricewatch.com researchs the best prices
on computer hardware.
Section #4 (Lets Assemble!)
This next part is very important so read carefully...
-
First things first get yourself a clean desk to work on.
-
Place your ATX stlye computer case on the desk and slide/lift the top off.
Inside should be a bunch of wires coming out
of the power supply in the back and a bunch of wires coming out near the face of the box.
-
The next thing your going to want to do is place your mother board inside
the case and fasten it in. Their might be
metal coverings covering the holes in the computer case were the parralel ports and serial ports on the mother board
should poke through, go ahead and poke those out with a screw drive so you can fit the mother board in snuggly. Every
Case fastens mother boards in different ways. Some use plastic pegs, some use metal screws. It will hopefully be obvious
which you have to use.
-
#4 Once the mother board is mounted properly you will need to fasten the floppy
drive, and cdrom into the computer case.
All computer cases store floppy drives differently there maybe a slide out container that you screw them into. You'll
have to make sure that the the floppy drive is right side up (duh!) and that the pins are facing towards the back of the
computer. Installing the CDROM is pretty much the same in all computer cases. Some mounting rails should have come
with your mother board. You need to fasten those to the sides of the CDROM and you should be able to slide it right in
to one of the top bays.
-
Insert your Video Card. There are presently about 3 differnet forms of slots
on your mother board. PCI, ISA, and AGP.
Video Cards are presently made for all 3 of them. AGP stands for "Accelrated Graphics Port" Video Cards made for this
slot are generally more high tech/performance. PCI's work and so do ISA (Althoug ISA is more Old School). Gee how
do I tell the difference? Well AGP slots more than likely is the only small, brown, slot on your mother board. PCI
you probably have the most of these their white and little longer than AGP. ISA, these are longggg and black, ugly.
Insert your Video Card and snug it in there firmly. Don't force it (duh).
-
Time for that evil Hard Disk installation. We'll Hit hooking up the power
supplies and Installing the Hard Disk at the
same time just for fun. Insert the Hard Disk In a very much similar way to the way you inserted the floppy disk. But
Before you do make sure that the jumper settings are correct on the back of Har Disk. Most hard disks are shipped in
single mode, but if you want to run multiple hard disks (which we won't discuss) you need to set the jumpers differently.
Jumpers are little metal prongs connected with little jumpers that complete a connection. You figure it out. Anyway
you got your hard disk in now its time to hook up the power supplies. The hard disk and the CDROM have similar power supp
lies. 3 or 4 prong. Hook those funny looking cords coming out of the back of the power supply into your CDROM and Hard
Disk. Theres a smaller one that hooks into your floppy it should be obvious. Theres a big power supply (the biggest one
in the lot usually made of white plastic) It fits into a slot on your mother board, it is the main power supply to your
mother board. Its kind of tricky to get in so be careful.
-
Now that you have your Power Supplies hooked up you'll need to connect your
Periphrials to your Mother Board. Use the IDE
Controller Ribbon I know you all have. Hey one end goes to your CDROM (make sure the red line on the ribbon "pin 1" is
matched up with the first pin on the back of your CDROM) and the other end goes to your mother board (same deal). The
same goes for your hard disk and yoru floppy. Figure it out its not that difficult. You'll know you did something wrong
when you get a floppy disk fail on boot.
-
Finishing touches. Don't forget to connect those nasty wires coming out from
behind the face of your computer case to
your mother board. They control the on, off, reset, hard disk activity, and power switch. Every mother board is different
so i hope you have a manual with your mother board. Most specify with 2 or 3 character paraphrases that make no sense.
For Example "PWR SWT" = Power Switch "RST SWT" = Reset Switch. Or even more vague than that.
Ok your ready to give it a whirl, you'll need to get in your system bios. The "DEL" key should usually get you in.
Get it to autodetect your hard disk. Accept the Setting and Save your Configurations. Install Your OS and your ready to go.
That easy!! Ha! you'll prolly have lots of trouble theres a million resources online to help you. Get to it.
REASONS WHY COMPUTER CRUSH
REASONS WHY COMPUTER CRUSH

Fatal error: the system has become unstable or is busy," it says. "Enter to return to Windows or press Control-Alt-Delete to restart your computer. If you do this you will lose any unsaved information in all open applications."
You have just been struck by the Blue Screen of Death. Anyone who uses Mcft Windows will be familiar with this. What can you do? More importantly, how can you prevent it happening?
The number one reason why Windows crashes is hardware conflict. Each hardware device communicates to other devices through an interrupt request channel (IRQ). These are supposed to be unique for each device.
For example, a printer usually connects internally on IRQ 7. The keyboard usually uses IRQ 1 and the floppy disk drive IRQ 6. Each device will try to hog a single IRQ for itself.
If there are a lot of devices, or if they are not installed properly, two of them may end up sharing the same IRQ number. When the user tries to use both devices at the same time, a crash can happen. The way to check if your computer has a hardware conflict is through the following route:
* Start-Settings-Control Panel-System-Device Manager.
Often if a device has a problem a yellow '!' appears next to its description in the Device Manager. Highlight Computer (in the Device Manager) and press Properties to see the IRQ numbers used by your computer. If the IRQ number appears twice, two devices may be using it.
Sometimes a device might share an IRQ with something described as 'IRQ holder for PCI steering'. This can be ignored. The best way to fix this problem is to remove the problem device and reinstall it.
Sometimes you may have to find more recent drivers on the internet to make the device function properly. A good resource is www.driverguide.com. If the device is a soundcard, or a modem, it can often be fixed by moving it to a different slot on the motherboard (be careful about opening your computer, as you may void the warranty).
When working inside a computer you should switch it off, unplug the mains lead and touch an unpainted metal surface to discharge any static electricity.
To be fair to Mcft, the problem with IRQ numbers is not of its making. It is a legacy problem going back to the first PC designs using the IBM 8086 chip. Initially there were only eight IRQs. Today there are 16 IRQs in a PC. It is easy to run out of them. There are plans to increase the number of IRQs in future designs.
Ram (random-access memory) problems might bring on the blue screen of death with a message saying Fatal Exception Error. A fatal error indicates a serious hardware problem. Sometimes it may mean a part is damaged and will need replacing.
But a fatal error caused by Ram might be caused by a mismatch of chips. For example, mixing 70-nanosecond (70ns) Ram with 60ns Ram will usually force the computer to run all the Ram at the slower speed. This will often crash the machine if the Ram is overworked.
One way around this problem is to enter the BIOS settings and increase the wait state of the Ram. This can make it more stable. Another way to troubleshoot a suspected Ram problem is to rearrange the Ram chips on the motherboard, or take some of them out. Then try to repeat the circumstances that caused the crash. When handling Ram try not to touch the gold connections, as they can be easily damaged.
Parity error messages also refer to Ram. Modern Ram chips are either parity (ECC) or non parity (non-ECC). It is best not to mix the two types, as this can be a cause of trouble.
EMM386 error messages refer to memory problems but may not be connected to bad Ram. This may be due to free memory problems often linked to old Dos-based programmes.
Every motherboard is supplied with a range of chipset settings that are decided in the factory. A common way to access these settings is to press the F2 or delete button during the first few seconds of a boot-up.
Once inside the BIOS, great care should be taken. It is a good idea to write down on a piece of paper all the settings that appear on the screen. That way, if you change something and the computer becomes more unstable, you will know what settings to revert to.
A common BIOS error concerns the CAS latency. This refers to the Ram. Older EDO (extended data out) Ram has a CAS latency of 3. Newer SDRam has a CAS latency of 2. Setting the wrong figure can cause the Ram to lock up and freeze the computer's display.
Mcft Windows is better at allocating IRQ numbers than any BIOS. If possible set the IRQ numbers to Auto in the BIOS. This will allow Windows to allocate the IRQ numbers (make sure the BIOS setting for Plug and Play OS is switched to 'yes' to allow Windows to do this.).
4 Hard disk drives
After a few weeks, the information on a hard disk drive starts to become piecemeal or fragmented. It is a good idea to defragment the hard disk every week or so, to prevent the disk from causing a screen freeze. Go to
* Start-Programs-Accessories-System Tools-Disk Defragmenter
This will start the procedure. You will be unable to write data to the hard drive (to save it) while the disk is defragmenting, so it is a good idea to schedule the procedure for a period of inactivity using the Task Scheduler.
The Task Scheduler should be one of the small icons on the bottom right of the Windows opening page (the desktop).
Some lockups and screen freezes caused by hard disk problems can be solved by reducing the read-ahead optimisation. This can be adjusted by going to
* Start-Settings-Control Panel-System Icon-Performance-File System-Hard Disk.
Hard disks will slow down and crash if they are too full. Do some housekeeping on your hard drive every few months and free some space on it. Open the Windows folder on the C drive and find the Temporary Internet Files folder. Deleting the contents (not the folder) can free a lot of space.
Empty the Recycle Bin every week to free more space. Hard disk drives should be scanned every week for errors or bad sectors. Go to
* Start-Programs-Accessories-System Tools-ScanDisk
Otherwise assign the Task Scheduler to perform this operation at night when the computer is not in use.
5 Fatal OE exceptions and VXD errors
Fatal OE exception errors and VXD errors are often caused by video card problems.
These can often be resolved easily by reducing the resolution of the video display. Go to
* Start-Settings-Control Panel-Display-Settings
Here you should slide the screen area bar to the left. Take a look at the colour settings on the left of that window. For most desktops, high colour 16-bit depth is adequate.
If the screen freezes or you experience system lockups it might be due to the video card. Make sure it does not have a hardware conflict. Go to
* Start-Settings-Control Panel-System-Device Manager
Here, select the + beside Display Adapter. A line of text describing your video card should appear. Select it (make it blue) and press properties. Then select Resources and select each line in the window. Look for a message that says No Conflicts.
If you have video card hardware conflict, you will see it here. Be careful at this point and make a note of everything you do in case you make things worse.
The way to resolve a hardware conflict is to uncheck the Use Automatic Settings box and hit the Change Settings button. You are searching for a setting that will display a No Conflicts message.
Another useful way to resolve video problems is to go to
* Start-Settings-Control Panel-System-Performance-Graphics
Here you should move the Hardware Acceleration slider to the left. As ever, the most common cause of problems relating to graphics cards is old or faulty drivers (a driver is a small piece of software used by a computer to communicate with a device).
Look up your video card's manufacturer on the internet and search for the most recent drivers for it.
6 Viruses
Often the first sign of a virus infection is instability. Some viruses erase the boot sector of a hard drive, making it impossible to start. This is why it is a good idea to create a Windows start-up disk. Go to
* Start-Settings-Control Panel-Add/Remove Programs
Here, look for the Start Up Disk tab. Virus protection requires constant vigilance.
A virus scanner requires a list of virus signatures in order to be able to identify viruses. These signatures are stored in a DAT file. DAT files should be updated weekly from the website of your antivirus software manufacturer.
An excellent antivirus programme is McAfee VirusScan by Network Associates ( www.nai.com). Another is Norton AntiVirus 2000, made by Symantec ( www.symantec.com).
The action of sending a document to print creates a bigger file, often called a postscript file.
Printers have only a small amount of memory, called a buffer. This can be easily overloaded. Printing a document also uses a considerable amount of CPU power. This will also slow down the computer's performance.
If the printer is trying to print unusual characters, these might not be recognised, and can crash the computer. Sometimes printers will not recover from a crash because of confusion in the buffer. A good way to clear the buffer is to unplug the printer for ten seconds. Booting up from a powerless state, also called a cold boot, will restore the printer's default settings and you may be able to carry on.
8 Software
A common cause of computer crash is faulty or badly-installed software. Often the problem can be cured by uninstalling the software and then reinstalling it. Use Norton Uninstall or Uninstall Shield to remove an application from your system properly. This will also remove references to the programme in the System Registry and leaves the way clear for a completely fresh copy.
The System Registry can be corrupted by old references to obsolete software that you thought was uninstalled. Use Reg Cleaner by Jouni Vuorio to clean up the System Registry and remove obsolete entries. It works on Windows 95, Windows 98, Windows 98 SE (Second Edition), Windows Millennium Edition (ME), NT4 and Windows 2000.
Read the instructions and use it carefully so you don't do permanent damage to the Registry. If the Registry is damaged you will have to reinstall your operating system. Reg Cleaner can be obtained from www.jv16.org
Often a Windows problem can be resolved by entering Safe Mode. This can be done during start-up. When you see the message "Starting Windows" press F4. This should take you into Safe Mode.
Safe Mode loads a minimum of drivers. It allows you to find and fix problems that prevent Windows from loading properly.
Sometimes installing Windows is difficult because of unsuitable BIOS settings. If you keep getting SUWIN error messages (Windows setup) during the Windows installation, then try entering the BIOS and disabling the CPU internal cache. Try to disable the Level 2 (L2) cache if that doesn't work.
Remember to restore all the BIOS settings back to their former settings following installation.
Central processing units (CPUs) are usually equipped with fans to keep them cool. If the fan fails or if the CPU gets old it may start to overheat and generate a particular kind of error called a kernel error. This is a common problem in chips that have been overclocked to operate at higher speeds than they are supposed to.
One remedy is to get a bigger better fan and install it on top of the CPU. Specialist cooling fans/heatsinks are available from www.computernerd.com or www.coolit.com
CPU problems can often be fixed by disabling the CPU internal cache in the BIOS. This will make the machine run more slowly, but it should also be more stable.
With all the new construction going on around the country the steady supply of electricity has become disrupted. A power surge or spike can crash a computer as easily as a power cut.
If this has become a nuisance for you then consider buying a uninterrupted power supply (UPS). This will give you a clean power supply when there is electricity, and it will give you a few minutes to perform a controlled shutdown in case of a power cut.
It is a good investment if your data are critical, because a power cut will cause any unsaved data to be lost.
Fatal error: the system has become unstable or is busy," it says. "Enter to return to Windows or press Control-Alt-Delete to restart your computer. If you do this you will lose any unsaved information in all open applications."
You have just been struck by the Blue Screen of Death. Anyone who uses Mcft Windows will be familiar with this. What can you do? More importantly, how can you prevent it happening?
1 Hardware conflict
The number one reason why Windows crashes is hardware conflict. Each hardware device communicates to other devices through an interrupt request channel (IRQ). These are supposed to be unique for each device.
For example, a printer usually connects internally on IRQ 7. The keyboard usually uses IRQ 1 and the floppy disk drive IRQ 6. Each device will try to hog a single IRQ for itself.
If there are a lot of devices, or if they are not installed properly, two of them may end up sharing the same IRQ number. When the user tries to use both devices at the same time, a crash can happen. The way to check if your computer has a hardware conflict is through the following route:
* Start-Settings-Control Panel-System-Device Manager.
Often if a device has a problem a yellow '!' appears next to its description in the Device Manager. Highlight Computer (in the Device Manager) and press Properties to see the IRQ numbers used by your computer. If the IRQ number appears twice, two devices may be using it.
Sometimes a device might share an IRQ with something described as 'IRQ holder for PCI steering'. This can be ignored. The best way to fix this problem is to remove the problem device and reinstall it.
Sometimes you may have to find more recent drivers on the internet to make the device function properly. A good resource is www.driverguide.com. If the device is a soundcard, or a modem, it can often be fixed by moving it to a different slot on the motherboard (be careful about opening your computer, as you may void the warranty).
When working inside a computer you should switch it off, unplug the mains lead and touch an unpainted metal surface to discharge any static electricity.
To be fair to Mcft, the problem with IRQ numbers is not of its making. It is a legacy problem going back to the first PC designs using the IBM 8086 chip. Initially there were only eight IRQs. Today there are 16 IRQs in a PC. It is easy to run out of them. There are plans to increase the number of IRQs in future designs.
2 Bad Ram
Ram (random-access memory) problems might bring on the blue screen of death with a message saying Fatal Exception Error. A fatal error indicates a serious hardware problem. Sometimes it may mean a part is damaged and will need replacing.
But a fatal error caused by Ram might be caused by a mismatch of chips. For example, mixing 70-nanosecond (70ns) Ram with 60ns Ram will usually force the computer to run all the Ram at the slower speed. This will often crash the machine if the Ram is overworked.
One way around this problem is to enter the BIOS settings and increase the wait state of the Ram. This can make it more stable. Another way to troubleshoot a suspected Ram problem is to rearrange the Ram chips on the motherboard, or take some of them out. Then try to repeat the circumstances that caused the crash. When handling Ram try not to touch the gold connections, as they can be easily damaged.
Parity error messages also refer to Ram. Modern Ram chips are either parity (ECC) or non parity (non-ECC). It is best not to mix the two types, as this can be a cause of trouble.
EMM386 error messages refer to memory problems but may not be connected to bad Ram. This may be due to free memory problems often linked to old Dos-based programmes.
3 BIOS settings
Every motherboard is supplied with a range of chipset settings that are decided in the factory. A common way to access these settings is to press the F2 or delete button during the first few seconds of a boot-up.
Once inside the BIOS, great care should be taken. It is a good idea to write down on a piece of paper all the settings that appear on the screen. That way, if you change something and the computer becomes more unstable, you will know what settings to revert to.
A common BIOS error concerns the CAS latency. This refers to the Ram. Older EDO (extended data out) Ram has a CAS latency of 3. Newer SDRam has a CAS latency of 2. Setting the wrong figure can cause the Ram to lock up and freeze the computer's display.
Mcft Windows is better at allocating IRQ numbers than any BIOS. If possible set the IRQ numbers to Auto in the BIOS. This will allow Windows to allocate the IRQ numbers (make sure the BIOS setting for Plug and Play OS is switched to 'yes' to allow Windows to do this.).
4 Hard disk drives
After a few weeks, the information on a hard disk drive starts to become piecemeal or fragmented. It is a good idea to defragment the hard disk every week or so, to prevent the disk from causing a screen freeze. Go to
* Start-Programs-Accessories-System Tools-Disk Defragmenter
This will start the procedure. You will be unable to write data to the hard drive (to save it) while the disk is defragmenting, so it is a good idea to schedule the procedure for a period of inactivity using the Task Scheduler.
The Task Scheduler should be one of the small icons on the bottom right of the Windows opening page (the desktop).
Some lockups and screen freezes caused by hard disk problems can be solved by reducing the read-ahead optimisation. This can be adjusted by going to
* Start-Settings-Control Panel-System Icon-Performance-File System-Hard Disk.
Hard disks will slow down and crash if they are too full. Do some housekeeping on your hard drive every few months and free some space on it. Open the Windows folder on the C drive and find the Temporary Internet Files folder. Deleting the contents (not the folder) can free a lot of space.
Empty the Recycle Bin every week to free more space. Hard disk drives should be scanned every week for errors or bad sectors. Go to
* Start-Programs-Accessories-System Tools-ScanDisk
Otherwise assign the Task Scheduler to perform this operation at night when the computer is not in use.
5 Fatal OE exceptions and VXD errors
Fatal OE exception errors and VXD errors are often caused by video card problems.
These can often be resolved easily by reducing the resolution of the video display. Go to
* Start-Settings-Control Panel-Display-Settings
Here you should slide the screen area bar to the left. Take a look at the colour settings on the left of that window. For most desktops, high colour 16-bit depth is adequate.
If the screen freezes or you experience system lockups it might be due to the video card. Make sure it does not have a hardware conflict. Go to
* Start-Settings-Control Panel-System-Device Manager
Here, select the + beside Display Adapter. A line of text describing your video card should appear. Select it (make it blue) and press properties. Then select Resources and select each line in the window. Look for a message that says No Conflicts.
If you have video card hardware conflict, you will see it here. Be careful at this point and make a note of everything you do in case you make things worse.
The way to resolve a hardware conflict is to uncheck the Use Automatic Settings box and hit the Change Settings button. You are searching for a setting that will display a No Conflicts message.
Another useful way to resolve video problems is to go to
* Start-Settings-Control Panel-System-Performance-Graphics
Here you should move the Hardware Acceleration slider to the left. As ever, the most common cause of problems relating to graphics cards is old or faulty drivers (a driver is a small piece of software used by a computer to communicate with a device).
Look up your video card's manufacturer on the internet and search for the most recent drivers for it.
6 Viruses
Often the first sign of a virus infection is instability. Some viruses erase the boot sector of a hard drive, making it impossible to start. This is why it is a good idea to create a Windows start-up disk. Go to
* Start-Settings-Control Panel-Add/Remove Programs
Here, look for the Start Up Disk tab. Virus protection requires constant vigilance.
A virus scanner requires a list of virus signatures in order to be able to identify viruses. These signatures are stored in a DAT file. DAT files should be updated weekly from the website of your antivirus software manufacturer.
An excellent antivirus programme is McAfee VirusScan by Network Associates ( www.nai.com). Another is Norton AntiVirus 2000, made by Symantec ( www.symantec.com).
7 Printers
The action of sending a document to print creates a bigger file, often called a postscript file.
Printers have only a small amount of memory, called a buffer. This can be easily overloaded. Printing a document also uses a considerable amount of CPU power. This will also slow down the computer's performance.
If the printer is trying to print unusual characters, these might not be recognised, and can crash the computer. Sometimes printers will not recover from a crash because of confusion in the buffer. A good way to clear the buffer is to unplug the printer for ten seconds. Booting up from a powerless state, also called a cold boot, will restore the printer's default settings and you may be able to carry on.
8 Software
A common cause of computer crash is faulty or badly-installed software. Often the problem can be cured by uninstalling the software and then reinstalling it. Use Norton Uninstall or Uninstall Shield to remove an application from your system properly. This will also remove references to the programme in the System Registry and leaves the way clear for a completely fresh copy.
The System Registry can be corrupted by old references to obsolete software that you thought was uninstalled. Use Reg Cleaner by Jouni Vuorio to clean up the System Registry and remove obsolete entries. It works on Windows 95, Windows 98, Windows 98 SE (Second Edition), Windows Millennium Edition (ME), NT4 and Windows 2000.
Read the instructions and use it carefully so you don't do permanent damage to the Registry. If the Registry is damaged you will have to reinstall your operating system. Reg Cleaner can be obtained from www.jv16.org
Often a Windows problem can be resolved by entering Safe Mode. This can be done during start-up. When you see the message "Starting Windows" press F4. This should take you into Safe Mode.
Safe Mode loads a minimum of drivers. It allows you to find and fix problems that prevent Windows from loading properly.
Sometimes installing Windows is difficult because of unsuitable BIOS settings. If you keep getting SUWIN error messages (Windows setup) during the Windows installation, then try entering the BIOS and disabling the CPU internal cache. Try to disable the Level 2 (L2) cache if that doesn't work.
Remember to restore all the BIOS settings back to their former settings following installation.
9 Overheating
Central processing units (CPUs) are usually equipped with fans to keep them cool. If the fan fails or if the CPU gets old it may start to overheat and generate a particular kind of error called a kernel error. This is a common problem in chips that have been overclocked to operate at higher speeds than they are supposed to.
One remedy is to get a bigger better fan and install it on top of the CPU. Specialist cooling fans/heatsinks are available from www.computernerd.com or www.coolit.com
CPU problems can often be fixed by disabling the CPU internal cache in the BIOS. This will make the machine run more slowly, but it should also be more stable.
10 Power supply problems
With all the new construction going on around the country the steady supply of electricity has become disrupted. A power surge or spike can crash a computer as easily as a power cut.
If this has become a nuisance for you then consider buying a uninterrupted power supply (UPS). This will give you a clean power supply when there is electricity, and it will give you a few minutes to perform a controlled shutdown in case of a power cut.
It is a good investment if your data are critical, because a power cut will cause any unsaved data to be lost.
THE ULTIMATE BACKTRACK LINUX DISTRO
BackTrack Linux is a fine example of a specialized Linux distribution.
Its only purpose is to test your network, devices, and systems for
security vulnerabilities. BackTrack is packed with every security and
hacker tool used by security professionals and professional hackers. If
you're looking for all of the tools in one place, this is it.
You must love the command line to use this distro, although it does contain a few graphical tools, such as zenmap and wireshark. Even in graphical mode (which comes up with the Gnome desktop), most of the applications open in a terminal window. Fortunately, each command line application opens and displays the help text so you can refer to the command reference right there on the screen.
You must love the command line to use this distro, although it does contain a few graphical tools, such as zenmap and wireshark. Even in graphical mode (which comes up with the Gnome desktop), most of the applications open in a terminal window. Fortunately, each command line application opens and displays the help text so you can refer to the command reference right there on the screen.
BackTrack is a highly customized, Debian-based Linux distribution that you should only update through BackTrack's own repositories (http://all.repository.backtrack-linux.org/).
In short, BackTrack's tagline says it all: "The quieter you become, the more you are able to hear."
The distro is a bootable, live DVD that's approximately 2GB in size. If you decide to install it to a hard disk or USB drive, the installation expands to almost 7GB. BackTrack is perfectly suited to installation to a USB drive, so that it's portable and stealthier than a hard disk install. A 16GB USB drive holds the installation with plenty of room for saving files and data.
Remember that you'll need to save your data from your information gathering exercises so that you can write security audit reports for your clients. The Live DVD is powerful but considerably slower than a hard disk or USB disk. If you use the DVD, use a USB drive or mountable hard disk partition to save the information you gather.
 Figure 1: BackTrack->Information Gathering->Network Analysis.
At the final level, you'll find multiple choices for each type of analysis. For example, under Network Scanners, you have a list of 11 different network scanning tools from which to choose.
Figure 1: BackTrack->Information Gathering->Network Analysis.
At the final level, you'll find multiple choices for each type of analysis. For example, under Network Scanners, you have a list of 11 different network scanning tools from which to choose.
See Figure 2.

You must love the command line to use this distro, although it does contain a few graphical tools, such as zenmap and wireshark. Even in graphical mode (which comes up with the Gnome desktop), most of the applications open in a terminal window. Fortunately, each command line application opens and displays the help text so you can refer to the command reference right there on the screen.
You must love the command line to use this distro, although it does contain a few graphical tools, such as zenmap and wireshark. Even in graphical mode (which comes up with the Gnome desktop), most of the applications open in a terminal window. Fortunately, each command line application opens and displays the help text so you can refer to the command reference right there on the screen.
BackTrack is a highly customized, Debian-based Linux distribution that you should only update through BackTrack's own repositories (http://all.repository.backtrack-linux.org/).
What Do You Get For Nothing?
BackTrack Linux contains more than 300 security tools and utilities that are all open source. Many security professionals prefer them over expensive commercial programs. And, hackers certainly prefer hundreds of no cost, high-end applications to anything commercial. One reason for BackTrack's popularity is its anonymity. You don't have to register (Registration is optional). No names, bank accounts, or user accounts are associated with obtaining the ISO image. Additionally, no spyware will report back to any vendor.In short, BackTrack's tagline says it all: "The quieter you become, the more you are able to hear."
The distro is a bootable, live DVD that's approximately 2GB in size. If you decide to install it to a hard disk or USB drive, the installation expands to almost 7GB. BackTrack is perfectly suited to installation to a USB drive, so that it's portable and stealthier than a hard disk install. A 16GB USB drive holds the installation with plenty of room for saving files and data.
Remember that you'll need to save your data from your information gathering exercises so that you can write security audit reports for your clients. The Live DVD is powerful but considerably slower than a hard disk or USB disk. If you use the DVD, use a USB drive or mountable hard disk partition to save the information you gather.
What's Included in the Distro
The BackTrack Distribution includes the following major tool categories:- Information Gathering
- Vulnerability Assessment
- Exploitation Tools
- Privilege Escalation
- Maintaining Access
- Reverse Engineering
- RFID Tools
- Stress Testing
- Forensics
- Reporting Tools
- Services
- Miscellaneous
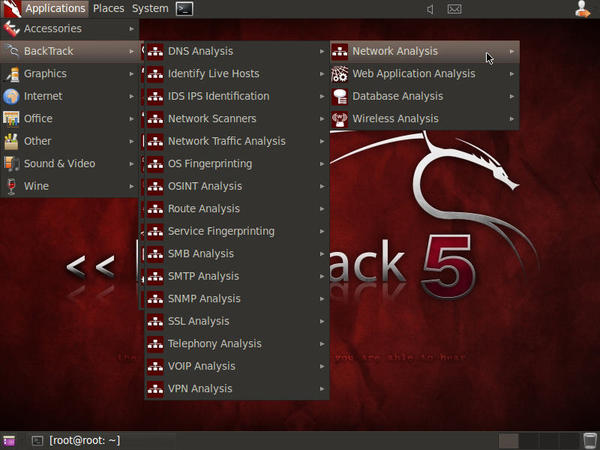 Figure 1: BackTrack->Information Gathering->Network Analysis.
See Figure 2.
40 WINDOWS 7 EXCELLENT TIPS
1. Launch Taskbar Apps in a Cinch
You probably have all your favorite apps pinned to your taskbar. Launching each requires you moving your mouse all the way down and clicking. Boring!An easier is to press the Windows key and the position of the app in the taskbar. For example, in the example below, I have Explorer in the first position. Pressing Win+1 will open it up right away. Oddly, using the numpad for this doesn’t seem to be working.

I wish I could multitask better
2. Search Within Documents
By default, Windows doesn’t search the contents of files that aren’t indexed. If you’re in a hurry and need everything searched, prefix your search keywords with content: and Windows will look for every instance of the word.3. Change the ‘Shut Down’ Button Behavior
For people like me who hibernate on a whim, the shut down button in the start menu is an absolute hindrance. Two clicks to get what I want? Unacceptable. Fortunately, you can easily customize this behavior.
I still prefer XP's approach. Win followed by U and enter.
4. Enable Internet Searches from the Start Menu
A slightly impractical but still very useful tip. From the start menu, run gpedit.msc. In the window that opens up, go to User Configuration -> Administrative Templates -> Start Menu and Taskbar. In the right page, you should find an entry called Add Search Internet link to Start Menu. Go ahead and enable it to see Windows display a Search the Internet link with every search.
As I mentioned, not very practical but at least saves you from opening a browser
5. Copy into the Command line
Let’s start off with a nerdy one. Often when you’re following a tutorial online, you’ll be asked to run a few commands in your command line. You coyly press Ctrl+V but uh oh. What’s this? Nothing happened.To copy something into the command line, press Alt+Space which invokes the windows menu. Now go to the edit option and choose paste. Voila! To make it even shorter Alt+Space followed by E and P gets it done in four keystrokes.
6. Use the Volume Mixer to Granular Audio Control
Did you know Windows ships with the ability to control volume on a per app level? You’d usually control the volume by clicking on the speaker icon in your system tray. For the volume mixer, right click on the icon and choose the mixer. You’ll notice a window with options for your main playback device as well as each application that’s capable of outputting sound. In the example below, I have Firefox, and Winamp running.
Great song, if you're wondering.
7. Create a Picture Slideshow on your Desktop
Tired of using the same wallpaper but tired of having to constantly change your wallpapers? Windows 7 has a solution.The much easiest way is to select multiple images in an explorer shell anywhere, right clicking and choosing Set as Background. Windows will automatically cycle through the chosen images.

You're free to select as many as you want
8. Invoke the Run Utility in a Single Keystroke
As a power user, I’m constantly looking for getting things done quickly. The run utility is a big help in this aspect. Launching it is still a chore. The easier way? Win+R. Keep in mind that the utility is launched with user level permissions only.
Hola there, indeed!
9. Adding Additional Clocks
I work as part of a distributed team and I frequently have to look up times in different cities. To make this work in Windows 7, click the clock icon in your tray. Choose Additional Clocks in the windows that pops up and add the additional cities you want. Unfortunately, the additional times don’t exactly get displayed in your tray — you need to hover over the clock.
Yes, I'm writing this article this late.
10. Instant Window Docking
Do you have multiple windows open at a time and in need of some immediate organization? Press the Windows key and the left or right arrow key to dock that window to that portion of the screen.Once docked, you can revert to your earlier position and size by pressing the Windows key and the opposing arrow key.
11. Create Custom Keyboard Shortcuts
Did you know you can launch your favorite applications through custom shortcuts? Let me show you how, it’s easy.
Great game and gets a thumbsup from me!
12. Maximize and Minimize Windows in a Heartbeat
Tired or too busy to click the maximize button? Windows provides you with a super quick shortcut: Win+Up key. What about minimizing, you ask? Win+Down key . Pretty nifty when you’re juggling lots of windows.13. Clean Up Your Text Rendering
One thing I adore on OS X is the clean, crisp typography that it renders. While earlier versions of Windows struggled with this aspect, 7 is pretty spot on.If you’re unhappy with the current way it renders text, you can always tune it up. Go to Control Panel -> Appearance and Personalization and choose Adjust ClearType text under the Fonts category. The utility that pops up should walk you through setting up text rendering the way you want.
Pay attention to this tool -- it relies on user input for proper calibration
14. Turn Your PC Into a Wifi Hot Spot
Windows 7 ships with the ability to turn any run of the mill wifi adapter into a working, basic wifi router.Setting it up is a matter of running two commands as well as clicking a few checkboxes. But for the sake of brevity, I’m not including the full guide today — you can find it here.
15. Tweak the Autorun Behavior
By default, Windows 7 pops up an autoplay window when you plugin new media. While a lot of people find it quite useful, it merely gets in the way for me.Thankfully, you can tweak this behavior in a granular manner. Want your audio CDs to autoplay in Winamp but want your movie DVDs to open with VLC instead? Or want autoplay disabled on just your USB devices? Easy. Go to Control Panel -> Hardware and Sound. There you can find a separate section just for autoplay. The first link lets you tweak everything to your heart’s contents.

It's best to disable autoplay for software
16. Open Folders in New Processes for Added Stability
Folders are opened under the same process by default which, while more efficient, can cause issues when you’re dealing with an unstable file system. You can work around this issue by opening each folder in its own process. You can do so by pressing Shift when right clicking a folder and choosing Open in new process.
The approach is pretty similar to how browsers sandbox plugins and tabs.
17. Use the Inbuilt Black Box
Windows 7 ships with a utility that records the steps you’ve taken on the computer automatically including mouse clicks. You can use these recordings to speed up issues when you’re dealing with tech support.Use the previously mentioned Win+R combo to bring up the run dialog and type in psr. Just click on the bright red button to get started with recording your steps.

This tool is a boon when you need tech support.
18. Remove the Recycle Bin from the Desktop
I tend to run a super tight ship on my desktop. No icons whatsoever. When I first started using Windows 7, the recycle bin was a thorn in my side. Vista let me right click and delete the entry but Windows 7 denied me that.As I figured out earlier, the functionality is still present — just behind a couple of clicks. Right click on the desktop, choose Personalize and then Change Desktop Icons on the left side pane.
Uncheck the relevant entry and off the bin goes!

It should be apparent which options is relevant here
19. Insta-Lock Your Workstation
Do you have someone at the door in the middle of a financial transaction or something else sensitive? It’d be wise to lock your computer before leaving but it takes multiple pesky mouse movements and clicks to get it done.There is a simple combo in 7 to instantly lock your desktop: Win+L. Really helps when you’re in a hurry and has saved me lots of times.
20. Minize All Open Windows
If you’re running a Rainmeter or otherwise widget heavy desktop like me and need to look at your desktop instantly to look something up, the traditional way is a bit of a chore.Look no further than a quick Win+M which will instantly minimize all open windows. Win+D does roughly the same thing except it seems to render the widgets invisible as well.
21. Restore the Quick Launch Bar
I was one of those people who used the quick launch bar fervently in Vista. Even though, this feature is not enabled by default in 7, there is a quick workaround.Right click your taskbar, choose Toolbars -> New toolbar. In the dialog that pops up, paste in %AppData%\Microsoft\Internet Explorer\Quick Launch. You can now tweak the bar’s position, enable/disable titles and the size of the icons.

Start here
22. Show the AM/PM Symbol in the System Tray
Depending on which locale you selected during installation, the time in the system tray may not display the AM/PM marker. Changing it takes only a few steps.Go to Control Panel -> Clock, Language and Region and choose Change the date, time or number format. In the window that pops up, look for the Short time setting and change it to hh:mm tt

I still can't get over the way the yanks format their dates
23. Set the Taskbar to Show Text Along with Icons
The default taskbar is setup so that apps only display their icons. Which works for me but you may feel otherwise — specially if you’re feeling nostalgic about Vista.
aka Vista mode
24. Disable Aero Peek
When you hover over the icon at the end of your taskbar, Windows displays renders just the borders for each window letting you take a look at your desktop — otherwise called Aero peek. This might be a performance killer if you run an older generation machine.
For those reading these captions -- again, some excellent music
25. Zoom in Effortlessly
For users who need to zoom into their screen quickly, here is an alternative that’s mouse free: Win plus + button. The Windows magnifier tool will kick in at 200% magnification. You can zoom in further or zoom out once done.
Yes, the tool really is this small. Works great though.
26. Shift Click for a New Instance of an App
Here’s a cool trick: if you have an app running that has an icon in your taskbar, shift or middle click on its icon and Windows will launch a fresh instance of the application.As an added bonus, Ctrl + Shift + click will open an instance with admin privileges.
27. Automatically Reduce the Volume When a Call Arrives
I think a vast majority of our readers use our PCs to make voice calls. Windows 7 has lots of built-in functionality around this feature. Let’s take a look at one of the most practical.When you’re using a PC to make calls and you have a sound producing app on the side, Windows 7 will automatically reduce the system volume. I prefer completing muting everything and that’s how I’ve set mine up. Here’s how.
Press Win+R and type in mmsys.cpl. This will take you directly to the Sound section of the Control Panel. Click on the Communications tab and choose Mute all other sounds. As expected, this will automatically mute everything but the call.
28. Move Your Page File
This is one of those fabled performance tricks told over the years: moving your system’s paging filr from the C partition to a separate hard drive gives you a nice little performance boost. I’ll let you google up about the whys but here is how to do it.Open Control Panel -> System -> Advanced System Settings. Choose the Advanced tab and click on the settings button of the Performance category. In the popup, click on the Advanced tab and finally the change button. Uncheck the solitary checkbox and create a new page file in a different hard drive after selecting the No paging file option for the C partition. Phew!
29. Activate God Mode
Though the name is quite misleading, the fabled God mode is a neat trick. Invoking it is pretty easy. Create a new folder titled GodMode.{ED7BA470-8E54-465E-825C-99712043E01C} and the folder’s icon will change to resemble a control panel and will contain a plethora of control options.
And you will know I am the Lord when I lay my vengeance upon you.
30. Shake to Minimize
This is another of those nifty little window management tricks. When you’re working on a cluttered desktop, grab the titlebar of a window and give it a vigorous shake and every other window will minimize meekly providing you all the focus you need.As a bonus, Win+Home does the same thing.
31. Drag and Drop to Path Glory
When working in the command line, there are plenty of times where you need to provide the path to a specific file or folder. Compiling code, for example. Instead of typing it out, just drag the file into the command prompt and its path will automatically be inserted.32. Enable Hidden Wallpapers
Considering wallpapers are, well, free this isn’t as impressive as I’d like but hey, hidden is hidden and unlocking equals dopamine. Right? Right?Go to C:\Windows\Globalization\MCT and you’ll find it stuffed with folders named MCT-xx where xx is a named region. Each of these folders contains region specific themes and wallpapers. Go nuts. Or not. It’s your call, really.

Yay! Dopamine!
33. AutoArrange Your Desktop
You can ask Windows 7 to arrange your desktop by right clicking on the desktop and choosing View -> Auto arange. Once enabled though, you don’t have to go through all those clicks to re-arrange your desktop. Pressing and holding F5 does the trick!34. Easier App Switching
Alt+tabbing is nice but there is an easier way to switch to your apps. Press the Windows key plus the position of the app in the taskbar. For example, if an app is placed first in your taskbar, press Win+1 and the app will get focus. If it’s not running, it will be launched, as mentioned earlier above.35. Open a Command Prompt at a Specific Folder
Again, a tip that works out for devs. Press the the Shift key when right clicking on a folder and you’ll see additional options. One amongst them is Open command window here. Really helps if you don’t feel to comfortable with the command line.
That's the Ruby root folder, if you're interested.
36. Calibrate Your Screen
Windows 7 ships with calibration tools in built. While you google around for the long way, here is a quick tip. Press Win+R, and enter dccw.exe in the popup. The Windows Display Color Calibration tool will pop up to sort out your issues.
The calibration tool's welcome screen
37. Monitor Your Performance with Resource Monitor
Windows 7 is usually incredibly quick for me but if yours is acting out, here is a quick little tool buried in Win 7 to help you diagnose the issue.Click on the start menu and type in resmon to launch the Resource Monitor. The tool provides you with an indepth look at what is eating your CPU cycles, memory and network.

Only video games and transcoding seem to make any kind of dent in modern CPus
38. Enable Checkboxes to Select Multiple Files
I think everyone knows to press the Ctrl key to make multiple selections. Here is a keyboardless way to make it happen.Go to any folder, click on the the Organize button on the top and select Folder and search options. Go to the view tab and enable the Use check boxes to select items option. Once done, a small checkbox will appear next to each item letting you select multiple items with just a mouse.

Yes, I know the file names are incredibly chaotic
39. Navigate Your Taskbar With Your Keyboard
You can easily move through your taskbar directly through just your keyboard. Press Win+T to cycle through the taskbar icons. Once the initial combo has been pressed, you can also use the arrow keys to navigate your apps.40. Launch Task Manager in the Proper Context
I bet you always press Ctrl+Alt+Del to bring up the venerable task manager. Have you noticed there is a slowdown before it launches?While you can deal with the technicalities of why it happens here, here is a quick little shortcut that step around the entire process: Ctrl+Shift+Esc.
Subscribe to:
Posts (Atom)